|
Home IT Security Hobbies/Crafts Cobham Park Links Contact me |
Andy Webber Metal turning |
I mainly do turning in wood. However, I have also done some metal turning. Some of this has been on a metalwork lathe (eg making bushes out of brass). But a question often asked in internet forums is "can you turn metal on a wood working lathe?". The short answer is "yes, but ..." there are limitations depending on the power of the lathe, your tools and your technique. I have a 1/4 horse power variable speed lathe (similar to Axminster's Carbatec), and that is good enough for turning brass. At about the time I wanted to turn some brass, I happened also to be reading a copy of W. Henry Northcott's "A treatise on Lathes and Turning, Simple, Mechanical and Ornamental" which was first published in 1868. One thing that is clear from this text is that in 1868 there was very little difference between wood lathes and metal lathes. At that time, most metal turning was done by hand (as in the tool was held and handled by hand rather than in a tool post; also the drive was often from a treadle rather than from steam).
So, using the techniques described in Northcott, turning brass and aluminium with ordinary woodturning tools (mainly scrapers) is quite easy, if time consuming. Pewter turns very nicely even using gouges - but more of a scraping cut. I use High Speed Steel (HSS) tools. Be prepared to sharpen your tools more often.
One trick more often used on metal than wood is to use a file on the rotating work piece (note I'm talking about filing the work, not using an old file ground up to make a scraper - there is much discussion about this on the net with the loudest voice saying "don't do it"). Used with care, a flat file can produce a smooth flat (cylinder or cone) and accurate surface. A flat file also helps to produce graceful convex (external) curves. I use second cut and smooth cut files; if you feel the need to use a bastard cut file then you ought to try the scrapers again.
If you get jitter or chatter on the scrapers then it can be very hard to get rid of since everything starts vibrating causing more jitter. There are 2 options:
For finishing, go up through the grades just as you would on wood. As for wood, lower the speed. Be sure to use silicon carbide based abrasives (emery paper, wet 'n' dry, etc). Aluminium Oxide papers will blunt off too fast. Be sure to unload the paper (clear the swarf) often. Since metal doesn't have a predominant visible grain like wood, you can't hide the scratches made by abrasives in the grain. When you think you are nearly done with one grade, stop the lathe and rub lightly at 90 degrees. You should be able to see if you have got rid of all the scratches from the previous grit. I haven't tried Micro-Mesh yet - I go from about P600 wet and dry to 0000 steel wool. From there I go on to buffing compounds and metal polish. Steel wool can still leave quite large scratches in brass and aluminium, but polishes like Brasso are also quite aggressive - beware that if using something like an old cotton shirt then you may get patterns in the brass from the weave of the cotton.
![]()
Probably my best bit of metal turning to date is a couple of brass pens. Inspired by an aluminium pen made by a friend, I took a pen kit, stripped the gold plating to reveal the underlying brass. Then I took a length of 1/2" brass rod and made a pen in the conventional way. The only difference I made was rather than drilling a 7 mm hole and gluing a brass tube inside I drilled and reamed a 1/4" hole. The internal diameter of the conventional 7mm tubes is close enough to 1/4" for this to work with the help of a little carefully applied glue. The pen is beautifully balanced and writes with a lovely flourish. Unfortunately, it is a little on the heavy side for me; it might suit a blacksmith or a bricklayer.
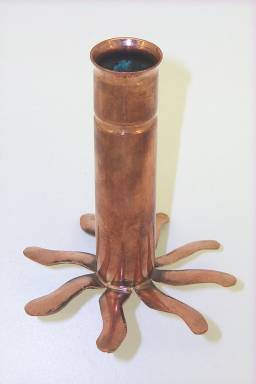
I'm interested in trying out metalspinning. This just about counts as spinning. It came about after a conversation with a friend who wanted come candlesticks. She is keen on recycling and had recently been on a course to learn some plumbing techniques. And suddenly the idea of making candlesticks from some surplus 22mm copper pipe came to me. The standard candle is 3/4" (19mm) which is slightly smaller than the inside diameter of the pipe. So, a little spinning crimps the pipe a little at the top to grip the candle, quite a lot a little lower down to set a depth stop and also at the bottom before the base flares out. I also soldered a disk in at the depth stop so that a candle could not burn all the way down and fall to the bottom. This is the prototype; the final ones were not so highly polished helping to keep the appearance of having been salvaged.
![]()
